Uploading to Flickr by Lukas "Gladius" W.P.
- Using the on-site uploader
- Using the Uploadr Application
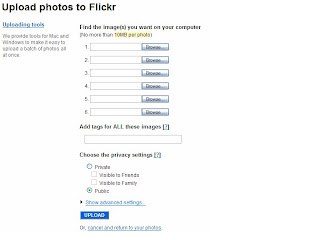
Click the link, and be lead to a page that looks like this picture.

Follow the guidelines and check to make sure your pictures less than 10 megabytes.
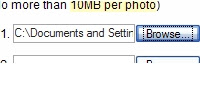
Then, just click each "Browse," Select an image file, and then click "Open" in the documents window.

You can put one picture into each "Browse," and flickr cannot handle zip files (but a way to mass-upload if you want is coming up.)
Once you have the 6 (or less) pictures you want to upload, choose communal tags. The tags you place in the box will appear on ALL SIX of your pictures, so choose carefully.
Choose whether to make you photos Private (Friends or Family), or Public. Most will be Public.
And then Simply click "UPLOAD." Leave the window open, at least until they are done uploading, then flickr auto-resizes the pictures for you.

You gain a square size (75x75) a thumbnail (100x67) Small (240x160), Medium (500x333), Large (1024x681), and an original size at uploading. Some might not be applied; For instance, if your picture is 500x500 pixels, You won't have a large size, just Medium, and then original.
After they have been uploaded and resized, You go to a screen where you can easily customize the name of the Image (without editing, it's the file name), the description, and the tags. You can change any of these aspects later in the future at any time, so don't worry.
Just click "SAVE," and your pictures will appear on your main page!
Now, if you have TONS (or more than is reasonable to do in batches of six) of pictures to upload, you want to use the flickr uploadr.
 Next to where you clicked "Upload" on the Home flickr page, there is text "Or, look at our uploading tools..." Click this.
You will be lead to a page titled Help/Tools. At the very top of the list of choices, it says Flickr Uploadr for Windows, and then just under that it has Flickr Uploadr for Mac.
Click the corresponding "Download the Flickr Uploadr" link for your computer, and go through the download process, it all depends on your browser and OS.
The installation wizard is fairly straightforward as well, and I wouldn't recommend making an icon on your desktop, as you don't use the uploadr terribly much.

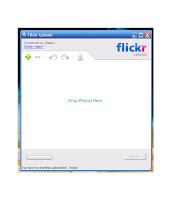
Find where you saved the Uploadr, and double click to open up a small window. Open up your documents, and click-drag pictures (or entire folders, but still don't try zips) into the "Drop Photos Here" area. Thumbnails should appear quickly.
If you accidentally put pictures into the group you don't want uploaded, select them and click the red "-." You can rotate pictures using the icons at the top, and the lightswitch controls settings.
The first time you use the uploadr, you have to connect it to your flickr account. No big deal, just click the link it gives you and Accept it's connection.
Anyway, once you get the pictures into the Uploadr that you want, click Upload...
Choose tags, (again, these tags go on EVERY SINGLE picture you upload in this batch, so be careful, even though you can change it afterwards; it's just a hassle), put them all into a set (or create a set for all of them), choose the Publicity of them, and click "Finish" to begin uploading. Don't close the uploadr until it is done uploading!
The pictures should appear on your flickr page immediately.
There is one final way to upload, but this ONLY WORKS IF YOU ARE A PRO MEMBER! If you have a picture uploaded to flickr, and then say, edit it, you can "replace" the photo and keep comments and notes on it. You could seriously mess things up, so make sure it's at least a similar picture!
On the low right of the picture in flickr, under the list of "Additional Information," you will see "replace this photo" at the bottom of the list. Click it, and a small text box with "Browse..." button, just like on the upload page. Choose a picture, and press Upload. Ta-DA! Photo replaced! now adjust notes and whatnot accordingly (as you can move around notes people put on your pictures.)
Just be aware that as a normal flickr Member, you have a max of 200 photos in your photostream!
That's it for uploading, and thanks for reading!


1 comment:
That's great. I'll add it tomorrow - after minor editing to make it fit - on the various sites and consider that section done. Great work.
Post a Comment